Click, boom, and your network is compromised. All a hacker needs is one successful exploit and you could have a very bad day. Recently, we uncovered one artifact that we would like to break down and showcase. We will get "into the weeds" here and really deep-dive on the technical details, so put on your ear protection and let's walk down the range.
Editor's Note: This post originally published on Threatpost.
The Smoking Gun
Recently, Huntress’ ThreatOps team uncovered one malware artifact that I would like to break down and showcase.
While at first glance this looks like gibberish, we can take it apart and understand what is really happening here. We will move through the code in a procedural fashion, taking one line at a time and understanding the syntax.
The first thing to note is that this took the form of a Windows “batch” script, or a file with a .bat extension. Batch scripts are interpreted and executed by the Windows command prompt, or the “cmd.exe” program. cmd.exe is the default command-line interpreter for Windows operating systems, but it is an older utility that dates back to DOS (or the Disk Operating System). In the world we live in now, developers and security professionals prefer to work in PowerShell, a much more modern command-line shell and language.
PowerShell will be introduced here in just a moment, but first we have to discuss the differences in syntax. Variables in PowerShell are denoted by a “$varname” syntax, with the name of the variable being prefixed by a dollar sign. In cmd.exe batch scripting, variables are indicated like %varname%, with the variable name wrapped in percent-signs on either side. In the case here, we see an environment variable being referenced, %COMSPEC%. The value of this is:
C:\Windows\System32\cmd.exe
That value will be put in place where the %COMSPEC% syntax is. When executed, it will start cmd.exe with the parameters and arguments that follow. In our “weaponized” analogy, we can call these beginning pieces of the payload, the trigger.
The Trigger
The /b argument to cmd.exe means “Start the application without creating a new window” so our hacker is trying to hide. /c means “run a single command and exit”, which explains that the rest of this code will actually execute.
That start command that follows will spin off a new program, again with the /b to enforce no window is created. The /min argument seems to be added for just extra measure—the application would start minimized (if, for some reason, a window were to be created with the /b argument).
Following that, we see powershell.exe is the application started. It also includes many arguments, like -nop (do not instantiate with a startup profile), -w hidden (yet again, do not create a window), -noni (do not run in interactive mode) and finally -c (execute a single command and exit).
At this point, we’ve finally made it into the string of code that is passed into PowerShell. This does a few checks to ensure the payload being used for the target is appropriate.
The Sights
At the very start of the PowerShell syntax, we see:
This if statement conditional is interesting because it checks if the size of the “integer pointer” data type is equal to the number 4. This might seem like sort of a random check, but it’s actually a clever method to determine the target’s system architecture. A 64-bit computer would have an IntPtr size of 8, referring to the length of memory addresses. A 32-bit system would have an IntPtr size of 4, so the code determines the path of PowerShell based off the architecture.
The $b we see created as a PowerShell variable to hold the path of the PowerShell executable.
Just following that if statement, we see the next bit of code:
This creates another PowerShell variable $s, this time being defined as a new object. In this case, the object created is a new process, with the filename being set to $b (as we now know is the path to PowerShell) with arguments like we have seen before. Yet again, we are spawning another PowerShell instance, with no profile and a hidden window.
The Bullet
For the command run by the new, innermost PowerShell instance, we see this syntax:
The [scriptblock]::create call defines new code to run. The New-Object IO.StreamReader allows us to read the code “on-the-fly”, pulled in from the passed-in data. The data we see is wrapped in these functions: IO.Compression.GzipStream, IO.MemoryStream, and [Convert]::FromBase64String, with the GzipStream using a Decompress flag.
This indicates that the large block of seemingly gibberish and nonsense characters is actually Base64 encoded GZIPed data.
Base64 is an encoding scheme that just represents data in a different format. Decoding the data is trivial—you just do the inverse operation. GZIP data is compressed, archived data, practically the same as a .ZIP archive you might see as a file on your computer. Thankfully, we can perform the inverse operation on that large chunk of data to better understand what it is doing.
But first, let’s wrap up the analysis on the rest of the code.
The Silencer & The Shooter
Just after the blob of Base64, we see these lines of code:
I jokingly refer to this segment as “the silencer” because it yet again tries to mask and hide the new PowerShell instance. That $s is our new process, with configuration values being set to hide the window, don’t create the window, and don’t keep track of standard output or invoke a new shell.
And of course, just following this snippet we see what really fires the gun.
$p=[System.Diagnostics.Process]::Start($s)
This line will start our new process and the decoded and uncompressed code within the Base64 blob will execute. Now that we have a better understanding of how this works, we can zoom in on that blob of data.
Inside The Ammunition
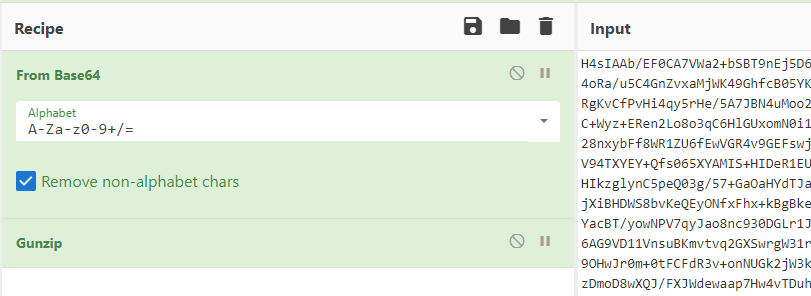
The real substance with this launcher comes from the Base64 encoded, GZIP compressed blob that is extracted and executed on the fly. That is this chunk:
We can perform the reverse operations with any toolkit we would like, whether it be on the command-line, or Python, or even with CyberChef.
For convenience’s sake, we can do this with CyberChef.

This returns with, unsurprisingly, more PowerShell code. As we already know, this will be executed by the launcher. The output dump looks like so:
Obviously, there is a lot to unpack here. This PowerShell code is at least somewhat readable in that there are clear newlines and whitespace—but variable names and some of the logic are still obfuscated. We will make sense of it piece by piece.
Examining the Gunpowder
The first function that we see defined in this PowerShell code is named sOH, which is not very descriptive. All of these function and variable names seem to be random and obfuscated, but we can make sense of them by reading the definition of the function.
The soH function takes in two parameters. It uses a technique to “reflectively” search for the address of Win32 API calls, so that PowerShell has the capability to run these core, internal, procedures known to lower-level operating systems. In the current context, it searches for where the System.dll might be loaded and uses that to find a desired function name within other DLLs that it could then execute. The name of the DLL this function is a part of, and the Win32 API function itself that should be called, are the two values passed in as parameters to this sOH function. This is all done by using “reflection,” the ability that allows PowerShell to perform some introspection and lookup already-defined procedures.
Ultimately, this gives PowerShell much more power. Gaining access to run the Win32 API functions allows it to do things like allocate memory, copy and move memory, or other peculiar things that we will see in the code very soon.
For our own understanding, we should mentally rename this function to something like:
So far, what we knew as the sOH function adds a portion of this new capability. If hackers want to use this tradecraft to invoke Win32 API function calls within PowerShell, they also need the functionality to work with “delegates”. The next function, b9MW, finishes the “boilerplate” code needed to be able to do this.
As you can see this is overflowing with the Windows internals necessities and fluff that make this work. We will not do a ton of in-depth analysis with this code, explaining each and every line and variable, but this function now provides the functionality to interpret Win32 API function parameters and return values.
Since our hacker is building out the functionality to be able to call Win32 API functions with PowerShell, they needed this sOH procedure to be able to find and locate the functions, and this b9MW procedure to supply parameters and understand the function return values.
With these two functions in place, the code now has the primitives to freely call any Win32 API function it would like. Next, we will see this in action.
The Explosive
Following those function definitions, this PowerShell snippet defines an array of bytes, pulled out by decoding more encoded Base64.
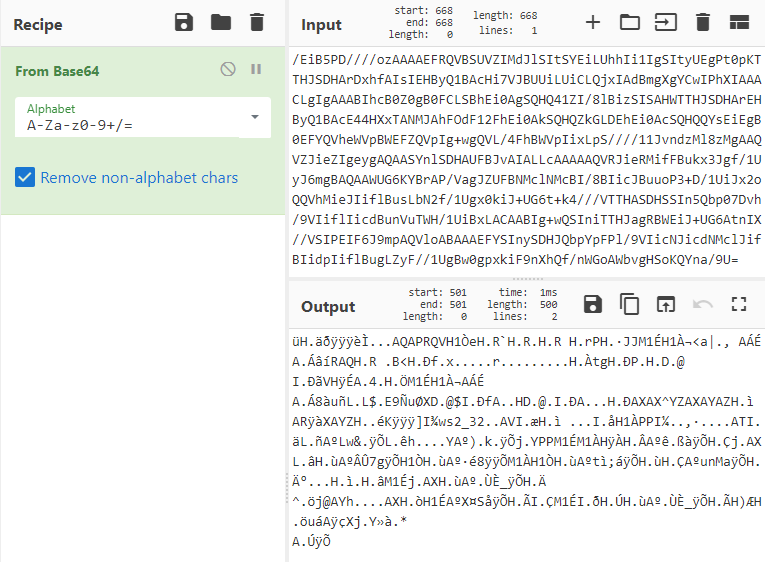
Decoding this Base64 unfortunately gives us a lot of non-printable characters.

We can go so far as to say this is shellcode, or processor instructions as opcodes that will be executed. Since this is binary data we can’t quickly make sense of it, but we do know this malware does end up using shellcode.
Just underneath this we see:
Now a $sC6US variable is in play, calling the GetDelegateForFunctionPointer function, with our newly defined sOH and b9MW functions. Remember, these functions allowed the hacker to load Win32 API functions—and in this case, we can see they have pulled out the VirtualAlloc function.
This VirtualAlloc function tells the operating system to allocate memory. As we can see from the function parameters, it invokes this function to allocate enough memory for the length of the $bUMJ byte array (the shellcode)! The 0x3000 indicates “reserve and commit this memory”, and the 0x40 indicates “this memory should be readable, writable, and executable.”
At this point, the allocated memory space is stored in that $sC6US variable. Then, we see a Copy function called to fill that memory space with the shellcode byte array, $bUMJ.
The malicious script has now allocated memory for the shellcode, and we can take an easy guess as to what they will do next. Run the shellcode.
Next, a $t6Y variable is created, again reaching for and calling a Win32 API call, this time specifically CreateThread. This CreateThread call is invoked with the $sC6US memory address—which as we now know, contains the shellcode. Ultimately, this executes the shellcode!
Following that, we see one more call to run the WaitForSingleObject Win32 API function. This will “block” execution and patiently wait for the shellcode to finish executing. You can see it includes the $t6Y variable (which is the new thread running the shellcode), and the 0xFFFFFFFF indicates “wait forever.”
Finally, after all these nested layers, obfuscation and abstractions, the malware has loaded shellcode into memory and executed it. The next question is: what exactly does this shellcode do?
As security analysts, we still have work to do. We can monitor the behavior of this malware—watch to see if it creates any new files or calls out to any other external endpoint. The shellcode itself looks very small, so perhaps that is a stub to load even more malware. While this article focused solely on understanding the PowerShell launcher, perhaps the next one might analyze the shellcode within a debugger like scdbg or observe the malware running in a contained sandbox.
We dove under the hood here to further understand what the hackers did and how their payload worked. Learning from the offense is the best way to have a stronger defense. Some mitigation tactics like enabling AppLocker or PowerShell Constrained Language Mode would at least block the execution of this initial launcher, and the hackers would have to work harder. At the end of the day, that’s our goal: make hackers earn every inch of their access.
Want to dive deeper under the hood and get shady with us? Join us for Tradecraft Tuesday to hear live threat analysis and commentary from our team of cyber experts.


